Camera obscura

An article in the May edition of National Geographic triggered me. It was about the work of  photographer Abelardo Morell. I was certain I came across his name before. And I was right. It was in the first episode of the BBC series The Genius of Photography. Abelardo Morell is specialized in the area of Camera Obscura. What he does is to make a room (or any space) completely 100% pitch dark. Making absolutely sure no light is coming in. Then he makes a small hole in one of the pieces of plastic he covered the windows with. What you then get is the outside view being projected upside-down on one of the opposite walls. This is the very foundation of photography. It’s the same technique being used by millions of us with our cameras every day. I find this so incredibly fascinating that I decided to dedicate an entry on it.

To see Morell in action, click here. It will take you to Episode 1 of the Genius Of Photography series on YouTube. The piece I’m referring to here is called Fixing the Shadows and starts at 3:12. So you have to fast foward a little bit. I desperately urge you to see this, though, in order to understand the fundamentals and very basics of photography. To see more of his camera obscura work, visit his website by clicking here. Browse the images or go to some other parts of the site to read Morell’s biography or see his other work.
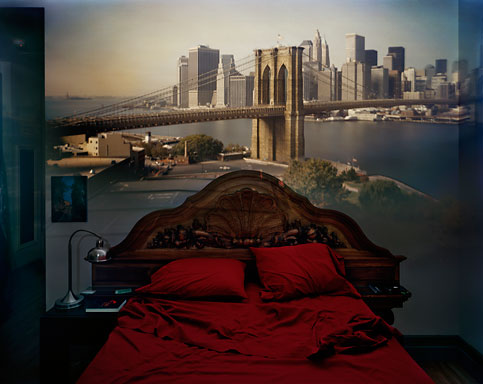
The principle of the camera obscura was already described by Aristotle as early as in the 4th century BC. Later on it was further refined by Da Vinci. This ultimately led to the very first cameras by Daguerre and Niepce. That’s how it all started and resulted in the cameras that we all know and love today. In line with what I wrote in earlier posts this month, the above image might easily be interpreted by a younger generation as the result of some Photoshop editing. You simply overlay one picture of a bed in a room with another picture of the Brooklyn Bridge. And that’s exactly my whole point! That is not the way it should be done! The reason why the image is so exceptional is the fact that it’s not created with an editing tool like Photoshop or Capture NX2. The effect you see on the image was created on purpose and at the time the picture was taken. The photographer – Abelardo Morell in this case – knew exactly what he was doing. He created the effect by understanding the basic principles of photography. I can only think of one word when I see a picture like this: respect.

Posted in Uncategorized | Leave a comment

Capture NX3 revisited

In addition to yesterday’s entry if you want to read more about the pro’s and con’s of Capture NX2, have a look at these 2 blogs. The first is by Thom Hogan, a well respected Nikon follower and author of many books. He dropped Capture NX2 off of his list of favourite software products. Read here why (scroll down to the commentary on Conversion of July 28). The second one is by Jason Odell. Also a Nikon follower and author of a number of books on Capture NX2 and Nik Software products. Read here why he’s using NX2 and what he believes are necessary updates to make Capture NX2 state-of-the-art again.

I can’t emphasize enough, though that this is all about editing tools. Real and proper photographers use their cameras to create effects. That is, they see a situation, then think about how they’re going to shoot it and then they press the release button. Therefore, the  real tools are aperture values, shutter speeds, ISO values, lenses with different focal lengths, lighting, camera position and so on. You get my drift, I guess.

Posted in Uncategorized | Leave a comment

Nikon Capture NX3

I like to consider myself to be a photographer. Some people disagree, I know, but let’s for the sake of argument accept this statement for now. This implies that I understand how my camera works and I use this knowledge to achieve certain (photographic) effects. I select my apertures consciously to play with depth of field and to put elements of the picture in or out of focus. Or I select a certain shutterspeed to create a sense of movement. I could go on and on. But I do this because understand how cameras work. I say this because I see a whole generation (like my own kids) who recognize an effect, but think it can only be done by Photoshop or a similar tool. It will probably have something to do with age, but as I have stated several times on this blog before, a real photographer works with his camera and keeps post-processing to a minimum. Does this then mean we shouldn’t do any post-processing with Photoshop-like tools? Of course not! To begin with, there’s one very simple reason for this. When shooting RAW the conversion to a JPG or TIFF is inevitable. So there you go, you must do some post-processing for each and every RAW image. The point is however, where do you draw the line. What is acceptable and what isn’t? In my opinion, there are no 100% clear rules for this. It’s personal. As a sort of guideline for myself I only allow what we used to do in the old (analog) days of the darkroom. So for me enhancing contrast, cropping, dodging and burning are all allowed techniques. Even experimenting with some filters is allowed in my opinion (didn’t we cross process films a long time ago?).

A lengthy intro just to say post-processing images is not only needed, it is mandatory (especially when shooting RAW). But it starts with understanding your camera and create effect when taking the picture. Not afterwards by using a tool on the PC or Mac. This is what Frank Doorhof likes to call why fake it if you can create it. Actually he’s planning doing a whole tour on this subject. Look here to find out more. Now as a hardcore Nikon addict, I don’t use Photoshop very much, but prefer Capture NX2 instead. For one very simple reason: it’s the only product that’s able to interpret Nikon’s NEF file for 100%. All Adobe attempts with camera profiles are nice, but they’re not able to read all the nitty gritty details of NEF like Capture NX2 can. But if you happen to like Photoshop or Lightroom and feel comfortable with it, please continue to do so. It’s not my intention to convert you. I just happen to work with Capture NX2 and like it. Besides the technical reason mentioned above, once you’re used to the unique U-Point technology with Control Points, believe me, every other tool is a pain. On top of that, it is a non-destructive way of editing without the need for sidecar files like in the Adobe products.

So, is Capture NX2 perfect? Again: of course not! Plenty of discussions on several forums illustrate that there’s room for improvement (to say the least). I’m not going to repeat all the arguments here. Bottom line is that it’s about time Nikon released an up-to-date version of the product. If it was only to catch up with the competition. A couple of days ago I came across an entry on the Nikon Rumors website about an upcoming new release. The post states a Capture NX3 version to be expected this summer. Have a look here for the post. I must confess, I can’t wait for the day that it will be released. No matter how much I like NX2, a new version (with 64-bit support and a better user-interface as in View NX2) would be highly appreciated. And let’s be honest: it’s about time. And if indeed a number of Nik Software plug-ins would included (or at least be made possible to include) that would be a serious and major, major step forward. Currently only Color Efex Pro can be plugged in to NX2. Silver Efex Pro? Sorry, nocando! But let’s not get ahead of ourselves. Remember the information is coming from the Nikon Rumors website….  Let’s hope and pray they’re right this time.

Posted in Uncategorized | Leave a comment

Pets shots

Frequent visitors of this blog probably know that I’m mostly fascinated by portraits. Human portraits, that is. I find it most challenging to catch a person’s character in a shot by using the proper pose, composition and lightning. But every now and then you come across situations where you can take non-human portraits. Of your pets (domestic animals), for instance. As it happens, as of last week we have a new kitten. No big deal, millions of families have cats, but I must admit that these little kittens are irresistable. You simply have to take their picture. They beg you for it. They will put themselves on a chair and look it you as if they’re saying “you’re going to take my picture, or what?”.

So it happened. The kitten was sitting in one of our armchairs in the living room next to a big window. So without giving it a second thought, I grabbed my camera. Put it to 800 ISO and full aperture (f/2.8) and simply took a couple of shots with just the available light. Because I found the sharpness to be a bit sub-optimal, I took another series at 400 ISO (with slightly longer shutter speeds), but resulting in fractionally better sharpness. I like to think, at least. The only post-processing I did was a tiny increase of contrast (by using the familiar S-curve) and the application of a darken/lighten center filter of Color Efex Pro 3.0. And a tiny bit of glamour glow on the first shot. It behaved like a little film star, so I thought the filter was appropriate. Anyway, the results are below, so have a look and let me know what you think. Kitten portraits with available light.

Posted in Uncategorized | Leave a comment

Don’t let your eyes fool you

During the last weekend I watched an interesting webinar at Nik Software’s website. It was only posted a couple of days before, so quite recent. It’s called Visual Perception & Photography by Jack Reznicki and it is a 42 min. video about how your eyes can fool you. And of course, it being a Nik Software publication, how you can make use of certain tools, like Color Efex Pro 3.0, to manipulate your eyes and the way you look at photographs. For those who are interested, you can find the webinar here.

For those who find it too much hassle to watch the whole video: it shows some images where perfectly straight lines appear to bend at the end, a spreadsheet of rows and columns seems to use 4 colours where in fact actually only 3 are used, a checkerboard with a “dark” field in the shadow of another object turns out to be the same colour as a “light” field. It contains those kind of tricks, if you like, to illustrate how your eyes can be fooled. And then Jack Reznicki goes on to photography and how we can make use of this knowledge. For instance, we know that eyes are attracted to the lighter parts of an image. And to what is in focus versus to what is out of focus. No groundbreaking new theories. In fact, stuff we already know, but at least for me it was good to see it presented in a comprehensive video.

During the Easter weekend we had a little family brunch outside (the weather was truly wonderful) where I took some simple pictures. Nothing special, some portraits of the boys and other ordinary shots. But after having watched the webinar, I wanted to apply some of the stuff during post-processing with Coler Efex Pro 3.0. So here are some of the before and after images. Judge for yourself.

The effect used in all images is the one called Darken/Lighten Center. The other effect I used is called Vignette Blur (only used in the “egg basket” image). The idea is direct the viewer’s attention to certain areas of the photograph. By making these areas slightly brighter and/or by putting them into focus. Again, basic material we’re all familiar with and certainly no rocket science, but nevertheless I found it interesting enough to share it with you. The webinar is highly recommended (although Nik should do someting about the quality of it; the sound is not very good and captures are poor also).

Posted in Uncategorized | Leave a comment

Still life and Jopie Huisman

As some of you might know, I’m following a photography course from Dies Groot. Our latest assignment was to produce a portrait or still life. I decided to go for the still life this time. The 17th century masters are one of my favourite sources of inspiriration and the Google Art Project (www.googleartproject.com) is the perfect vehicle to walk through all of these beautiful paintings from all over the world. Because spring is in the air, I set my mind on a vase with tulips (so Dutch…). To symbolise the winter that we leave behind, I added a bottle of red wine and some French cheese and put these in the darker part of the picture. Anyway, here it is. Judge for yourself.

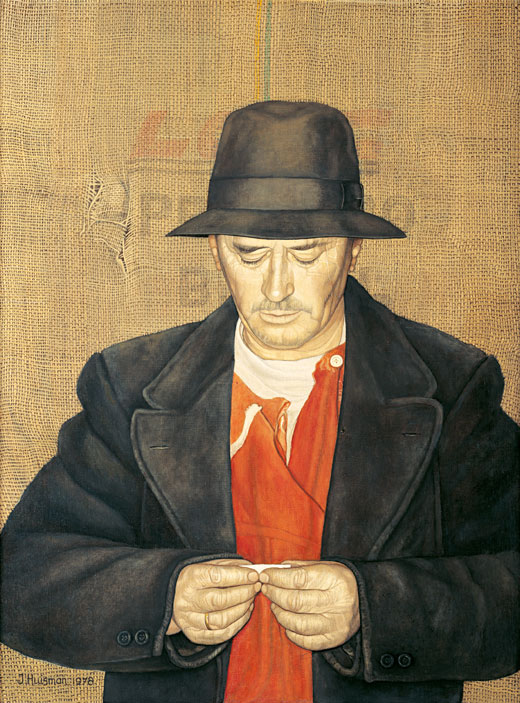
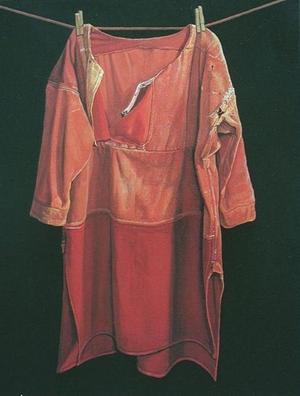
Today I visited the Jopie Huisman museum (www.jopiehuismanmuseum.nl). He was a Dutch painter with a unique own technique. Incredible details in his work. Lot of his work (at least the work he’s well-known about) has to do with junk and litter, like worn shoes, clothing, stale bread, etc. Simple day-to-day things with a story of their own and painted in the form of a still life.

Jopie Huisman (1922-2000) painted in such a realistic way, you almost think you can touch the objects he used. What we like to call 3D these days. The images above don’t do justice to the actual level of detail his work has. You really have to see that for yourself. Unfortunately, the museum is not part of the Google Art Project yet (if it ever will be…), but for me it’s definitely another source of inspiration. It will be a challenge to create a photographic equivalent of his paintings. As of today, it’s added to my list of things to do.

Posted in Uncategorized | 1 Comment

Monitor Quest

All my life I have been working with CRT type of monitors. I know that the current LCD monitors offer much better performance, especially for photo editing. But as long as the good old CRT boxes keep on working there’s nothing broken that needs fixing. But something did break. About a month ago my 21″ CRT monitor all of a sudden gave a high pitched noise and then a short snap. On top of that, it went completely black. It didn’t take much expertise to diagnose its death. Luckily I had another old CRT box as spare. However, it was only 19″ and behaved funny every now and then. For the time being, though, I could continue to work. For photo editing it was a disaster. Besides its smaller size, the colours were different also (even though I did calibrate it). To cut a long story short: time to invest in a new LCD monitor. Minor question: which one?

You have the obvious brands, like Eizo, NEC and LaCie. Without a doubt all very good monitors. Also very expensive. Way above my budget anyway. However, these brands also deliver entry level monitors. Eizo, for example, has next to their (expensive) ColorEdge line, the (cheaper) Flexscan monitors. The same goes for LaCie. Most of these cheaper models have IPS panels (which in my opinion is an absolute must for photo editing). Talked with both vendors at the Professional Imaging event. Asked them both specifically about the difference between their entry level monitors and IPS panels from Dell and HP (and recently also LG). When you compare the technical specs they’re all the same. They couldn’t give me a satisfying answer. My feeling is that with these brands you still pay for their name, even in the case of entry level monitors. They will still cost you roughly about € 1,000 to € 1,300. Although, ultimately I was prepared to pay this amount of money, I wasn’t convinced of the technical superiority. So what did I do in the end? Gathered as much reviews I could find on the web (there isn’t that much that feels really trustworthy, though). For a long time I switched between Dell’s U2410 and HP’s LP2475W, but after reading the reviews at www.prad.de and www.tftcentral.co.uk I finally ordered the HP LP2475W. I have it now for almost 5 days and it feels really good. I did calibrate it with my Xrite Eye One Display2. The 24″ size is simply heaven to work with. In Capture NX2 I can now compare images next to each other without a problem. What have I been struggling with for all these years? Should have done this lang ago. A 24″ wide gamut monitor that covers 100% of the sRGB and Adobe RGB colour spaces. For “only” € 495 (including VAT). If you’re looking for a good monitor for photo editing with a good price performance ratio, take the LP2475W.

All detailed technical specifications can be found at www. hp.com and at the review sites mentioned earlier.

Posted in Uncategorized | Leave a comment

Professional Imaging II

In my previous post on the Professional Imaging tradeshow I mentioned the portraits Vincent Boon was making at the Epson booth. Afterwards I noticed there’s a short videoclip available on YouTube of one particular shoot. As it happened, I was standing next to the cameraman who made this video. It was interesting to see Vincent at work and how the lights were setup. I certainly recommend watching. The end result is shown at the end of the clip.

If you have problems watching it here on my blog, you can also see it on YouTube directly by clicking here. If you want to see more of Vincent’s work, go to his blog or visit his regular website.

Posted in Uncategorized | Leave a comment

Professional Imaging

I visited the Professional Imaging tradeshow that took place in Nieuwegein from 13-15 March. A well attended event aimed at the professional photographer, as the name already suggests. All major vendors were represented, so a good opportunity to see what’s going on. And also a good opportunity to attend a number of workshops. The best news of all: it’s all for free! So, here goes:

Nikon
As a longtime Nikon user, it probably comes as no surprise that I’ve spent most of my time here. It may also come expected that the first workshop I attended was about Capture NX2. The presenter, Dutch photographer Johan Kerver, was hired by Nikon for the occassion. He did a good job at “selling” the product by demonstrating all the highlights. But hardly anything new to me. On the sharpening of images, though, he recommended using the “high pass” filter instead of the commonly used “unsharp mask”. I must say, the examples he showed were very convincing. Will certainly give this a try, so expect a blog post on this one day. Discussed the future of CNX2 with him afterwards. As far as he could see there’s no reason to doubt a next release. But he couldn’t/wouldn’t say anything more on the subject. Also discussed the same subject with another Nikon crew member. He was completely unaware of the ongoing discussion about CNX2’s future. As far as he was concerned it was a state-of-the-art product. I briefly explained to him what the competition has been doing the last two years or so, but decided not to waste too much time on him. I couldn’t help myself and simply had to pose the same question tp the people at the Nik Software booth. Of course, they gave me the story that they don’t develop CNX2. The were once asked by Nikon to help build it, but it’s being maintained by Nikon. I knew that. So I asked why all their wonderful plugins (Color Efex, Silver Efex, etc.) are not developed for CNX2 (except for Color Efex as the only exception to the rule). Does Nik Software have plans to release a Silver Efex version for CNX2? The answer: they would like to, but not allowed by Nikon! Can you believe this??? CNX2 is minimally maintained by Nikon and is getting further behind the competition. In my simple mind it would only make very good business sense to make use of broadly accepted plugins like the ones from Nik Software, to give CNX2 a reason to exist. But unfortunately, no. No information on new releases and no integration with other tools. Nikon’s strategy is completely beyond me here. Why the mystery and secrecy? It only leads to speculation and more people moving away from CNX2 (see also Thom Hogan’s website (www.bythom.com) who publicly no longer recommends the use of CNX2).

On a more positive note: I also attended a Nikon workshop presented by Rahi Rezvani. The most interesting one I attended of the entire show. He invited someone from the audience to act as an ad-hoc model. Took several pictures in a very simple studio setup with just one softbox and then started to do his magic on the computer. A real artist. It was amazing to see what this guy can do with Photoshop (using masked layers) and Silver Efex (!). I certainly recommend all of you to have a look at his work here. His communication skills can be improved, though. While he was doing his magic on the computer he hardly said a thing (even put his microphone off). So it was a bit difficult to understand what exactly he was doing, especially for an inexperienced Photoshop user like me.

Adobe
Attended a number of sessions in the Adobe theatre by Matt Kloskowski and Julieanne Kost. As to be expected, these sessions were very much focused in Photoshop, but nevertheless very good for me to see what can be done with it. Comparing Photoshop with Capture NX2 is comparing apples with oranges. For the kind of post-processing I do, Capture NX2 is more than adequate and absolutely the right tool. Especially in combination with Nik Software’s Color Efex Pro 3. I only wish Nikon was more transparent on the direction of the product. On very rare occasions I might need Photoshop. I will use the open source product Gimp if I run into such a situation.

Eizo/LaCie
In my quest of finding a good LCD replacement for my 10+-year old CRT monitor I also talked with the people at the Eizo and LaCie booths. To help me understand the technology and why I should pay an awful lot of money for their devices. I will publish a new post on this topic shortly.

All in all, it was a very interesting event and certainly worth visiting. Visited the Fotoflits booth, but all the people I know over there were engaged. Watched Frank Doorhof doing his workshops briefly. So crowded over there! Also watched Vincent Boon (www.vincentboon.nl) taking studio portraits at the Epson booth and got some inspiration out of it. If you’re interested in serious photography, make sure you register for next year’s event.

Posted in Uncategorized | Leave a comment

Glamour Glow

As a frequent visitor of this site you might know that I’m not a big supporter of all kinds of post-processing tricks. If you want to add a certain effect to your photo, then use photographic means as much as possible to achieve this. Use gels to get a colour effect, move your camera during exposure to get a blur effect, and so on. Frank Doorhof calls this “why fake it if you can create it”. This doesn’t mean of course that you shouldn’t do any post-processing at all. If you shoot RAW you simply must! I use Nikon’s Capture NX2 for correcting contrast, colours, white balance, cropping, etc. Basically, that’s about it. The Capture NX2 product is developed by Nik Software, Inc. as an independent software vendor, although 49% of their shares are owned by Nikon. The product does a very good job at correcting your Nikon RAW (NEF) images, but out of the box it doesn’t provide much else. Nik Software does provide a number of add-on tools, but unfortunately they only plug-in to Adobe and Apple products, not to Capture NX2. There is one exception to this: Color Efex Pro 3.0! As the name suggests, a tool of 50+ effects to enhance the colour of your pictures. And it  plugs in nicely to Capure NX2 as well. I’ve downloaded a trial version and have been playing around with it a bit. There is one particular effect I like very much. It’s called Glamour Glow. Instead of describing what it does, just click here to see some before and after images. Of course, all effects can be adjusted to you personal taste, but these examples are just as is.

Nik Software also produces a number of other tools, like Silver Efex Pro (for converting to and manipulating black and white images), HDR Efex and many more. Have a look for yourself at www.niksoftware.com. All other products work natively with Photoshop, Lightroom and Aperture.


Posted in Uncategorized | Leave a comment